


Photo by Isaac Smith on Unsplash
Hello World!
Learning and making web apps made easier these days. With stacks like MERN/MEAN without a doubt, production-ready apps can be delivered in no time. As a learner, I was sticking to the stack for quite a while. For Database needs, MongoDB is sufficient but is not the best in all cases. Creating relations are not implicit in MongoDB. That's where the Relational databases come into play. But many newbie developers completely skip the SQL and only learn NoSQL databases which is convenient to use but it has its own downsides.
I wanted to try SQL Database on my javascript stack project but it has been quite a while I learned SQL. So to make things easier I decided I might use any ORM because why not. I chose Sequelize for this app because it is beginner-friendly and doesn't need a lot of boilerplate code.
This blog is a guide to use Sequelize alongside express for consuming SQL database needs. Why need a guide when you have Sequelize docs? you might ask because the docs include the migrations functionality later in the flow but it's too late to set up later. This article helps you understand the migrations and the associations that sequelize gives you. We will be creating a simple social app back end.
You can use any database it does not matter as ORMs translate into its native SQL queries for you. This article uses PostgreSQL.
Packages needed to get started:
- expressjs
- sequelize
- sequelize-cli
- pg(if you're using Postgres)
Setting up the project
You need to already have PostgreSQL, Nodejs, and NPM installed on your computer. As this is not a beginner tutorial I hope you have these installed.
Starting our project
Create a project folder. I'm gonna name it sequelize-intro. Then move into the project folder.
mkdir sequelize-intro && cd sequelize-intro
Initiate a javascript project
npm init -y
The next step is to install the packages needed for the project
npm install express sequelize pg
Creating express server
Create index.js
touch index.js
Adding the necessary code to it. Use a code editor of your choice and then write the following code to index.js
const express = require("express") //importing express

const app = express() //creating an app
app.use(express.json()) //using json parser

app.get("/", (req, res) => { // defining route
 return res.json({message: "Hello, World!"})
})

app.listen(3000, (req, res) => { // listening on port 3000
    console.log("Server is running at localhost:3000")
})
Start the server. I'm using nodemon so the app refreshes on code update. Type the following in the command line.
nodemon index.js
if you see text similar to the following one in the command line then the app probably is working fine "for now".
[nodemon] 2.0.4
[nodemon] to restart at any time, enter `rs`
[nodemon] watching path(s): *.*
[nodemon] watching extensions: js,mjs,json
[nodemon] starting `node index.js`
Server is running at http://localhost:3000
Now the time to test the app. I'll be using postman for the REST API testing. You can use whatever works for you. Open up the postman and make the request.
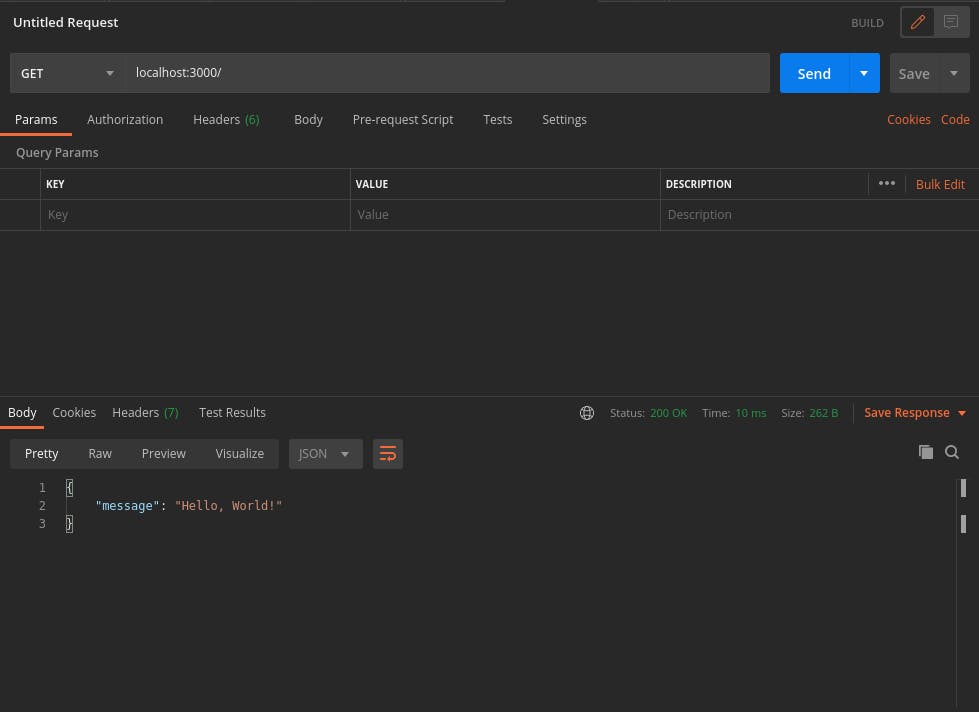
If you receive a status of 200 and a JSON response saying "message": "Hello, World!" your app is working. Tada, we have a working express hello world app. You can now go to sleep but if you still wanna know how to use sequelize stick with me I'll try not to bore you I swear.
Starting the sequelize part
We have already installed the sequelize in the starting stage so now we just have to use it. We'll first use sequelize-cli to initialize sequelize inside the current project. First, we will install sequelize as a dev dependency. Type the following command to install the sequelize-cli as a dev dependency.
npm install --save-dev sequelize-cli
Then we can finally initialize sequelize inside the current hello world project.
npx sequelize-cli init
The above command will generate the following folders inside your current project directory.
config- contains config file, which tells CLI how to connect with databasemodels- contains all models for your projectmigrations- contains all migration filesseeders- contains all seed files
Yeah, I copy-pasted the above text from the documentation. Because basically, it does what it says.
The next step is to edit the config file to our needs.
// config/config.json
{
  "development": {
    "username": "username", // change it to your postgres username
    "password": "password", // change it to your postgres password
    "database": "social", // name of your database
    "host": "127.0.0.1",
    "dialect": "postgres", // the database you're gonna use
    "logging": false
  },
  "test": {
    "username": "root",
    "password": null,
    "database": "database_test",
    "host": "127.0.0.1",
    "dialect": "mysql"
  },
  "production": {
    "username": "root",
    "password": null,
    "database": "database_production",
    "host": "127.0.0.1",
    "dialect": "mysql"
  }
}
With sequelize you can use different databases in different environments. Since we are in development I had only edited the development part of the config/config.json.
We can now create a database directly from the terminal. Just execute the following command.
npx sequelize-cli db:create
This creates the database in your machine. In my case, I have named the database "social". So it creates a database with the same name.
To see the list of databases. Use PSQL a PostgreSQL terminal client to list all the databases. Open up a new terminal and type in the following commands.
sudo su - postgres - This creates a new Postgres terminal session.
psql - opens up the PSQL a Postgres terminal client.
\l - lists all the databases.
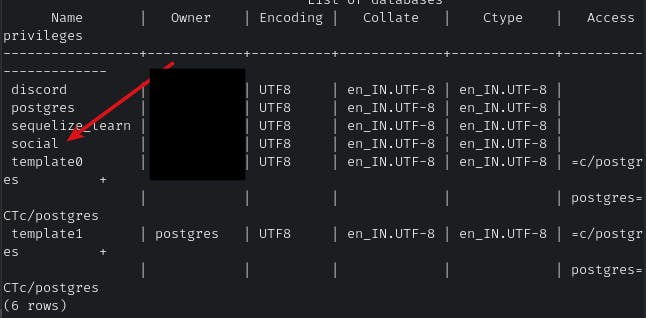
You should see the database created on your machine as above. Don't close this terminal window. We will be needing it in the upcoming section.
Next, off we can go about creating models. Models are tables that sequelize create and maintains. We will configure a simple user model first to represent users. Switch to the terminal with the project folder and type the following.
npx sequelize-cli model:generate --name User --attributes username:string
The above command creates a model with the User as a name and attributes username. Which in SQL world mean User is the table name and username is a column. Just to keep it simple we just can have a username field.
You can now see there are 2 files newly created. One inside models folder called user.js and one inside migrations folder called XXXXXXXXXXXXXX-create-user.js. This migrations file is what syncs the structure of the model with the database. So, whenever you're making changes to your model you should be making changes in 2 places. Now we can make changes to both the files.
First to user.js
// models/user.js
'use strict';
const {
  Model
} = require('sequelize');
module.exports = (sequelize, DataTypes) => {
  class User extends Model {
    /**
     * Helper method for defining associations.
     * This method is not a part of Sequelize lifecycle.
     * The `models/index` file will call this method automatically.
     */
    static associate(models) {
      // define association here
    }
  };
  User.init({
    username: DataTypes.STRING
  }, {
    sequelize,
    modelName: 'User',
    tableName: 'users' // add a table name attribute here
  });
  return User;
};
Next to the migrations file
// migrations/XXXXXXXXXXXXXX-create-user.js
'use strict';
module.exports = {
  up: async (queryInterface, Sequelize) => {
    await queryInterface.createTable('users', { // changed table name here
      id: {
        allowNull: false,
        autoIncrement: true,
        primaryKey: true,
        type: Sequelize.INTEGER
      },
      username: {
        type: Sequelize.STRING
      },
      createdAt: {
        allowNull: false,
        type: Sequelize.DATE
      },
      updatedAt: {
        allowNull: false,
        type: Sequelize.DATE
      }
    });
  },
  down: async (queryInterface, Sequelize) => {
    await queryInterface.dropTable('users'); // changed table name here
  }
};
Changing the table name doesn't gonna do any magic. It is a convention to name the tables in lower case plurals. So what has to be done has to be done. Now we'll sync the changes we made so far to the database.
Migrations are a feature that modern ORMs provide for us to make easier changes to tables and databases. It comes in handy when making changes to the tables. It would be much harder to deal with tables ourselves.
Switch to the terminal and type the following command.
npx sequelize-cli db:migrate
This syncs the changes to the database. In our case, it is creating a new model/table named "users". You can check it out in the terminal. Switch to the PSQL session terminal and check out the changes. First, select the database to use.
\c social - selects the database "social"
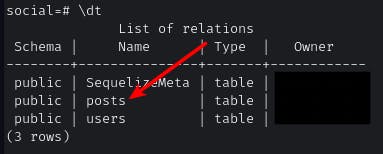
\dt - lists all the tables
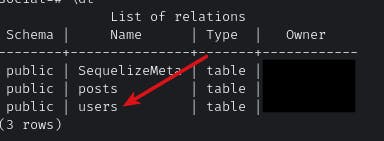
See the new table users in the list? Then you're good. Don't mind the other table named "posts" we are gonna create it soon. Table "SequelizeMeta" keeps track of the changes.
Now we'll go creating a new user by setting up the express app. Go to ./index.js in the root folder and type the following code.
...

const {User} = require("./models") //new

app.get("/", (req, res) => {
    return res.json({message: "Hello, World!"})
})

// new
app.post("/user/create", async (req, res) => {
    const {username} = req.body
    try {
        const isExist = await User.findAll({where: {username}})
        if(isExist.length > 0) return res.json({error: "User already exists"})
        const newUser = await User.create({username})
        return res.json({message: `${newUser.username} created`})
    } catch (error) {
        console.log(error);
        return res.json({error: "Server Error"})
    }
})

...
Don't modify any previous code and just make the changes just below the main route. We are now importing the model from the models folder. We haven't exported the User model because models/index.js does it for us.
The above code gets a username from the req.body and checks if the username already exists. If already exists it throws an error or goes to the next step i.e creating it.
Now we can test out using postman.
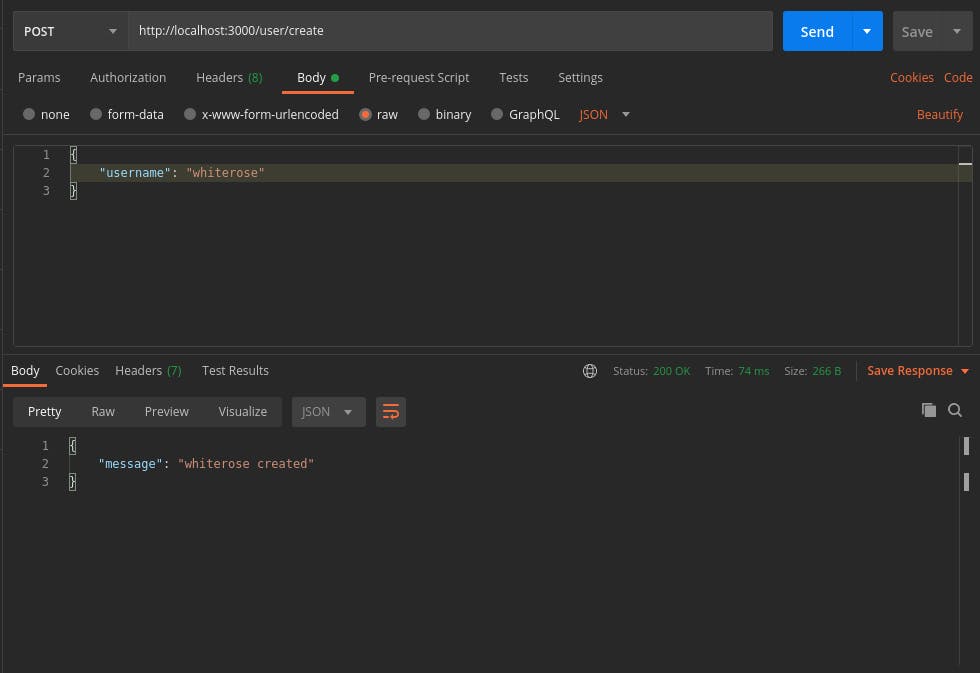
If you see something like this the user is created and you can check it out in the database.

The above confirms the data is stored. This completes the basic create operation using sequelize. Next, we will be making associations between tables by creating a new table called posts which stores posts that users have created.
Creating Associations in Sequelize
Up until now, we have configured and made create operation on the database using sequelize. Now we'll create a new "posts" model to store the user posts and associate them with the "users" table.
Following the same procedure. Create a model.
npx sequelize-cli --name Post --attributes title:string,body:string,creator:integer
This creates 2 files a migrations and a models file. We'll edit those to afford relationships on it. Switch to the text editor and edit the 2 files as follows.
First models/post.js
// models/post.js
"use strict";
const { Model } = require("sequelize");
module.exports = (sequelize, DataTypes) => {
  class Post extends Model {
    /**
     * Helper method for defining associations.
     * This method is not a part of Sequelize lifecycle.
     * The `models/index` file will call this method automatically.
     */
    static associate(models) {
      // define association here
      Post.belongsTo(models.User, { // This defines the association
        onDelete: "SET NULL",
        foreignKey: "creator",
        as: "creator_of_post" // This definition can be used later to easily join 2 tables
      })
    }
  }
  Post.init(
    {
      title: DataTypes.STRING,
      body: DataTypes.STRING,
      creator: {
        type: DataTypes.INTEGER,
        references: {
          model: "users", // referencing the 'users' table
          key: "id",
        },
      },
    },
    {
      sequelize,
      modelName: "Post",
      tableName: "posts", // change the table name to posts
    }
  );
  return Post;
};
Now migrations/XXXXXXXXXXXXXX-create-post.js
// migrations/XXXXXXXXXXXXXX-create-post.js
'use strict';
module.exports = {
  up: async (queryInterface, Sequelize) => {
    await queryInterface.createTable('posts', { // change the table name
      id: {
        allowNull: false,
        autoIncrement: true,
        primaryKey: true,
        type: Sequelize.INTEGER
      },
      title: {
        type: Sequelize.STRING
      },
      body: {
        type: Sequelize.STRING
      },
      creator: {
        type: Sequelize.INTEGER,
        references: {
          model: "users", // reference the 'users' model
          key: "id"
        }
      },
      createdAt: {
        allowNull: false,
        type: Sequelize.DATE
      },
      updatedAt: {
        allowNull: false,
        type: Sequelize.DATE
      }
    });
  },
  down: async (queryInterface, Sequelize) => {
    await queryInterface.dropTable('posts');  // change the table name
  }
};
This creates an association between post and user at the creator attribute. The as attribute used in the models/post.js will help in easily referencing the user table while fetching data in the post table. We'll see how that works in a while. Now we can migrate the changes.
npx sequelize-cli db:migrate
If you have accidentally made a mistake you can undo the changes using the migration undo command.
npx sequelize-cli db:migrate:undo
Now that we migrated the changes we can see the table created inside the database. Use \dt command to list the table and see the changes for yourself.
The posts table is created. We can create a route and check if post creation works. Type the following code in your root ./index.js
...
const {User, Post} = require("./models")
...
// below user route
app.post("/post/create", async (req, res) => {
    const {creator, title, body} = req.body
    try {
        const newPost = await Post.create(req.body)
        return res.json({message: "Post created"})
    } catch (error) {
        return res.json({error: "server error"})
    }
})
...
The route takes 3 parameters in the req.body. Which are title, body, and creator. Title and body are the content of the post and creator is an integer that takes the id of the user who creates this post. Normally id should not be integers it should be UUID. For the sake of simplicity, we'll work with the thing that came with the boilerplate.
We'll test the route with the postman.
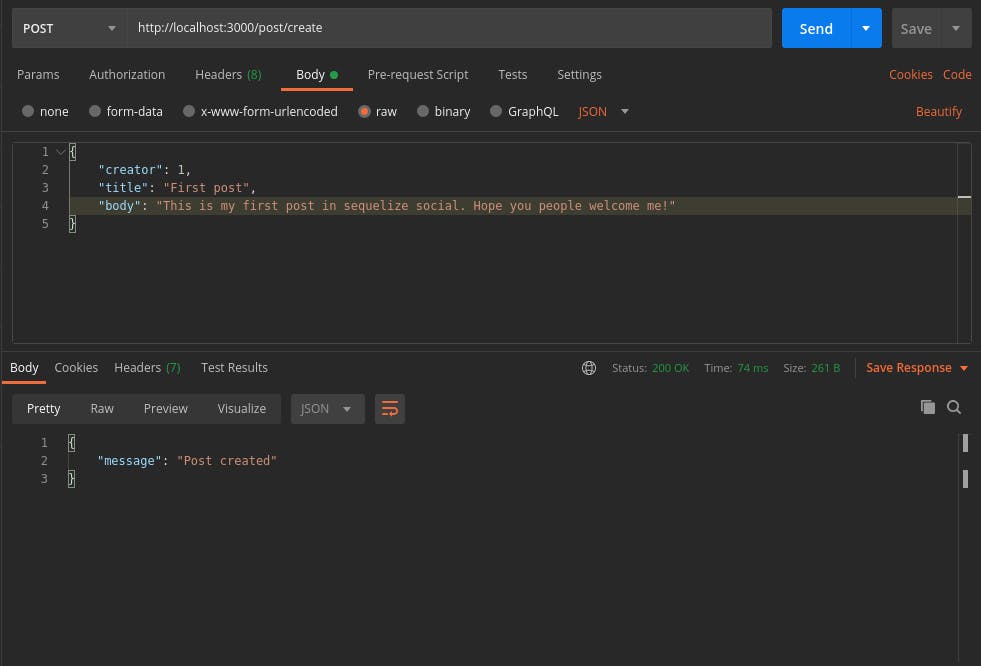
Since I have only one user I'll just use the id 1 in the creator field. Write whatever you want with the title and body. We have created a post successfully. All we have now is to make use of the sequelize associations to join the tables while fetching the data.
Fetching the data with associations
Now we will fetch the "post" data using sequelize along with its creator's details. We can now create a get route to fetch a single post data along with the creator's details.
Write following in your root ./index.js
...
app.get("/post/:postId", async (req, res) => {
    const {postId} = req.params
    try {
        const post = await Post.findOne({where: {id: postId}, include: "creator_of_post"}) // includes the creator details.
        return res.json({post})
    } catch (error) {
        console.log(error);
        return res.json({error: "server error"})
    }
})
...
The above code creates a route and whenever it is called the post is fetched along with the user data. Inside the include property we are passing the same string defined when we were creating the association attribute as. Time to test out the route using postman.
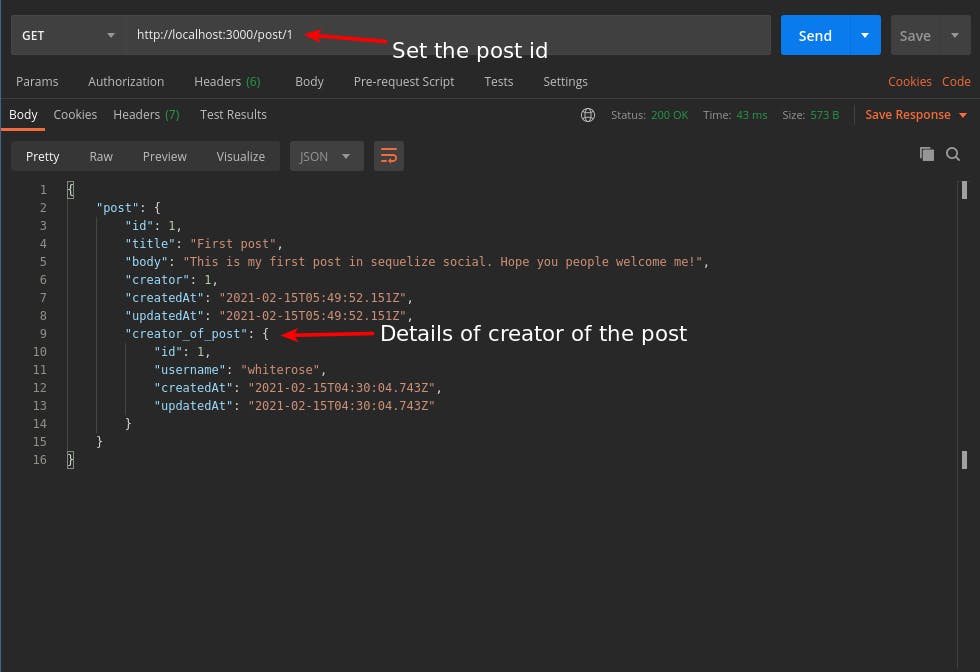
Post data with creator data is fetched. We still have one functionality left. That is reverse accessing the posts that a user has posted. Basically, each user can have more than one post. Reverse accessing posts from the user model is made simple in ORMs.
Type the following in models/user.js. This feature is ORM specific so you don't have to make any changes in migrations.
// models/user.js
...
module.exports = (sequelize, DataTypes) => {
  class User extends Model {
    /**
     * Helper method for defining associations.
     * This method is not a part of Sequelize lifecycle.
     * The `models/index` file will call this method automatically.
     */
    static associate(models) {
      // define association here
      User.hasMany(models.Post, {
        foreignKey: "creator", // column name of "posts" table where the relations is happening
        as: "user_created_posts" // definition to access
      })
    }
  };
...
Now we'll create a route to fetch the user data along with all the posts the user has created. This will be an array of posts since we have created only one post. We'll be given one post. This would work the same for any number of posts. Write the following in root ./index.js.
./index.js
...
app.get("/user/:userId", async (req, res) => {
    const {userId} = req.params
    try {
        const user = await User.findOne({where: {id: userId}, include: "user_created_posts"}) // returns an array of posts that this specific user has created.
        return res.json({user})
    } catch (error) {
        console.log(error);
        return res.json({error: "server error"})
    }
})
...
Fire up the postman and test the final functionality of our app.

That's it. Our app is complete it can create users, create posts, associate post with a user, access the posts along with the associated user. Thank you for sticking to the end.
This is my first ever article. Hope you like it and would like to have feedback on it.
Useful links:
Sequelize Docs: sequelize.org
Easy to learn sequelize tutorial: youtube.com/watch?v=3qlnR9hK-lQ
See you!